
DIY Tutorial // How to Install a Tiled Shower Surround
TACOMA CONVERTED GARAGE *This post is sponsored by Lowe's, a brand we use and believe in. All content, ideas, and words are our own. Thank you for supporting the brands that support the Grit and Polish.
The Tacoma Converted Garage bathroom recently got it's shower back and we're all pretty happy about it! It's been a solid 2 months sans bathing facilities around here and...well...I'm sure you can see why we're excited to have this project wrapped up. And today we get to share all about how we built it. Read on for Garrett's full tutorial, including all the products we used.

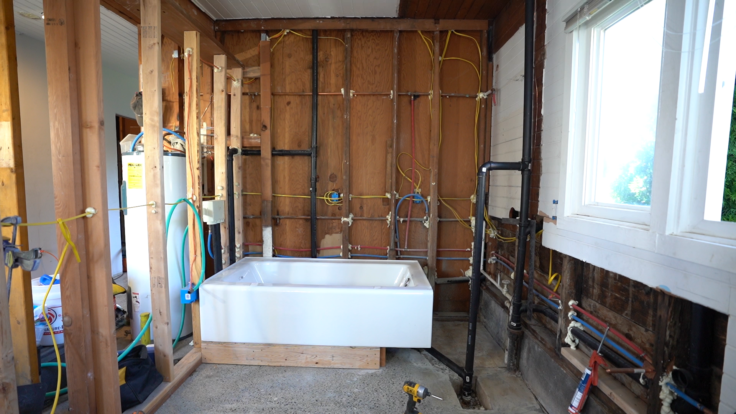
We opt for real tile surrounds and cast-iron tubs whenever possible and that's what we used here. Sure, the tub was heavy to get in, but cast iron is one of those 'forever' materials. This tub shouldn't have to be replaced again in our lifetime and that's something that makes us happy.
We're going to walk you through what we did, but first, here's a before shot of the old tub after the floors were demo'd. It's rough...

Yeah, it was bad. So about that new tile shower surround... Garrett's walking through exactly what he did below. You can also check out a video version of this DIY here:
DIY: Tile Shower Surround
Time: 3+ Days
Materials:
Delta Trinsic Shower fixture set
Tools
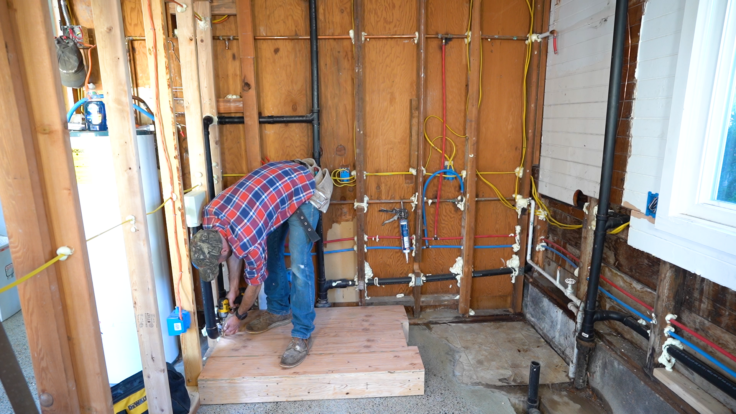
Step 1 // Plumbing + Installing the Tub
We installed the tub on an existing concrete slab and rather than cut, dig and re-plumb, we opted to elevate the tub on a platform to connect our drain to the existing pluming. We used 2x6" studs and a 3/4" plywood topper to raise the tub just over 6" above the slab. Even so, we did still need to chip out ~2" of concrete below to allow for the p-trap. Tub drain kits come with (almost) everything needed to connect the tub and overflow to the p-trap. You'll notice we added a 60° ABS fitting to the overflow and this was because on the Kohler Bellwether (which we absolutely love), the overflow outlet sits in a sloped surface and we needed this extra angled piece to connect to the drain. This is also the time to layout the fixtures and connect the supply lines to mixing valve. We selected the Delta Trinsic fixtures and like other manufactures, Delta has a universal rough-in valve body that we mounted 28" from the tub floor. The tub filler is 3" above the tub edge and the shower outlet is 6'10" above the tub floor. The tub filler and shower risers were plumbed with copper (not PEX per the manufacturers recommendations) but we connect the hot and cold supplies with PEX for simplicity.
Tip: In most cases plumbing goes in after framing but sometimes it's much easier to frame around the drain lines and that's what we did here!

Step 2 //Make sure the Bones are Strong
As with pretty much any reno project going heavy on the prep can save time, money, and result in a better finished project. So start with the bones. Our walls had some make shift framing and large gaps due to the old plumbing, so we added some 3/4" plywood for extra support. Hardie backer performs wonderfully as a tile support in wet locations but is not particularly strong so be sure the framing is solid before starting the install.

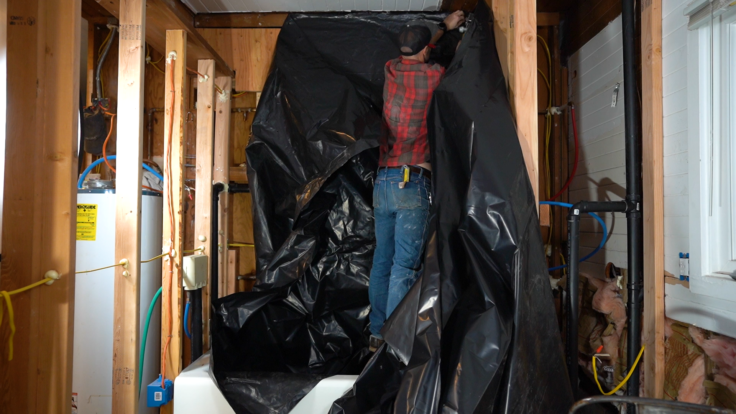
Step 3 // Vapor Barrier
Once framing and plumbing are in and everything's been charged/leak tested it's time for the vapor barrier. Despite appearances even the best tile installations are not water proof and we need a vapor barrier to prevent moisture from building up in the walls behind the Hardiebacker. We used 6mil plastic sheeting which is relatively inexpensive, durable, and has the added benefit that you can continue the project without waiting for a product to cure (as would be the case with a paint on barrier that goes over the Hardiebacker). We used a hammer tacker to attach the plastic to the studs and used one continuous sheet of vinyl so there are no seams. The bottom of the black plastic overlaps the tub edge a little bit so that any condensation that makes it through seeps down to the bottom and then out toward the tub rather than back to the wall.

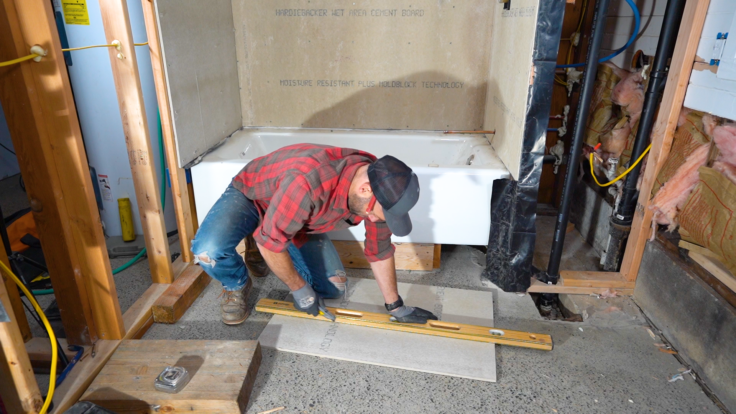
Step 4 // Hardiebacker
The Hardiebacker is a cement board product that comes in 3' x 5' sheets and 1/2" and 1/4" thickness. We put up 1/2" but if you are covering a plywood or lathe and plaster or other solid wall you could use 1/4". It's installed using coated screws that can resist corrosion in wet environments. We used 1.25" BackerOn screws with torx head. Highly recommend the torx head. Hardiebacker can be sized by scoring (several times!) with a utility knife then parted by applying pressure opposite the score (see the video for a demonstration!). Pliers can also be used to chunk out the backer for contouring around fixture outlets and other shapes.

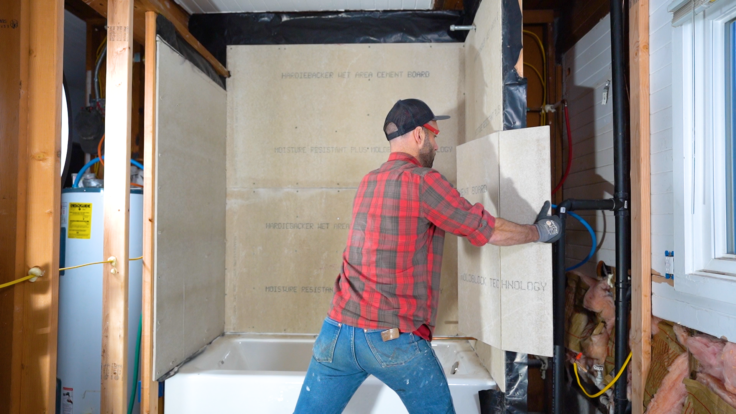
Tip: Hardiebacker comes in 3' widths and tile mats are usually 1' x 1' so if you install accordingly, you'll end up with 3 mats across each end of your surround.
Tip: Install a trim around your tile project for an easy finished edge.

Plan the installation to minimize cutting and piecing in. In our case, we cut full mats for the first row rather than piece in below a full mat after the fact. Speaking of cutting, you'll need a wet saw for most tile projects and we used a fantastic Dewalt 10' wet saw for this one. We've used various tile saws over the years and this one is heads above the rest. It can plunge, which is key for cutting out in middle of the piece, cut angles, and rip 24" large format tiles. It is powerful and comes with a top grade blade so no chipping.Highly recommend getting a quality saw like this one if you have a large tile project.

Step 5 // Tape the Seams + Place the Tile
After the backer is up, it's time to mix the thinset mortar that will permanently bond the tile to the wall. We used a dry type ceramic tile mortar that requires mixing with water as opposed to a pre-mix since it's cheaper and one bag was sufficient for the entire project. We always follow the manufacturer's instructions on the bag and try to be precise with the water. This is when measuring buckets come in super handy. Proper mixing and application results in the longest lasting, most durable installations. You'll need a hefty drill with a grout-mixer attachment to mix the mortar in a 5 gallon bucket.

While you're waiting for the thinset to temper, tape the Hardiebacker seams with an alkali-resistant tape and then apply motor over the tape to smooth and strengthen the transitions.


We used a 1/4" notch towel to apply the mortar to the backer. This is a pretty standard size for walls where 1/2" notch trowels are for larger tiles typically on the floor. Spread and scrape the thinset to uniformly coat the backer then firmly press the tile onto the wall. Don't wait too long before getting the tile on there as the mortar will eventually dry out and won't stick well to the tile. Generally we try to get the big full sheets up as quickly as possible then come back and fill in with cuts.


Step 6 // Grout
Get a good night of sleep (or two!) once you have the tile installed, which will allow the thinset to cure before you tackle the grout. There are a few different kinds of grout you can choose from including pre-mixed, dry and epoxy grout. We generally go with a standard dry mix in a dark grey color. The darker the color, the more it hides, which is especially key in rentals. This was an un-sanded grout installation since our grout lines were less than 1/8".
A word about grout types: pre-mixes are more convenient but also more expensive. The epoxy grouts are more durable and stain resistant so consider that if you need a lighter color. You'll also need to choose between sanded and un-sanded, which is based on the space between tiles.


If you're using standard dry grout, mix it up in a small bucket using a grout-mixer attachment on your drill. Once the grout is properly mixed, apply it to a small section of the wall using a rubber gum float. Work the grout into the tile seams by holding the float at an angle to the tile surface. Start with a small section of wall, maybe 6sf, to get a feel for how quickly you work and how quickly the grout dries.
Tip: Don't re-temper the grout with more water as it hardens in the bucket. This degrades the durability of the grout.


Once the first section of tile has been completely grouted, wait 10-15 minutes (or whatever your grout manufacturer recommends) for the grout to lightly set. Then gently scrub the surface of the tiles with a damp sponge. The goal here is to remove excess grout from the surface of the tiles and not dig into the grout lines, so work with gentle pressure on the sponge. You also want to make sure your sponge is just damp and not wet because introducing too much water will re-hydrate the grout and you'll have to repeat this step again. I work with a bucket of clean water nearby so that I can rinse my sponge out and ring out the excess water before every fresh pass with the sponge.
A couple more tips on this step: for the sharpest (and smallest) grout line, lightly scrub the grout until the full tile edge is revealed. This is also the time to do some QC on your grout job so fill in any places you missed with a bit of grout using your finger. I also recommend setting yourself a timer while the grout is setting. Because if you wait too long to do the scrub, the grout sets up too much and gets really hard to remove.
Tip: Get the grout up quickly and work in small sections. You don't want the grout setting up too much before you can get back with your wet scrub. Waiting too long before the initial scrub/wash can cause serious headaches!


Repeat the grout and wet scrub process for the entire tile surround. After the entire surround is been scrubbed and given time to dry, you'll notice there's still a slight haze on the tiles. Remove this film with a dry sponge or rag.

Step 7 // Seal the Grout and Install the Fixtures
Wait a day for the grout to cure then apply a sealant per the manufacturer's recommendations. The sealant will help keep stains and water from soaking into the grout. But unfortunately the sealant usually takes a couple days to set, so you'll have to wait to use the shower until then.
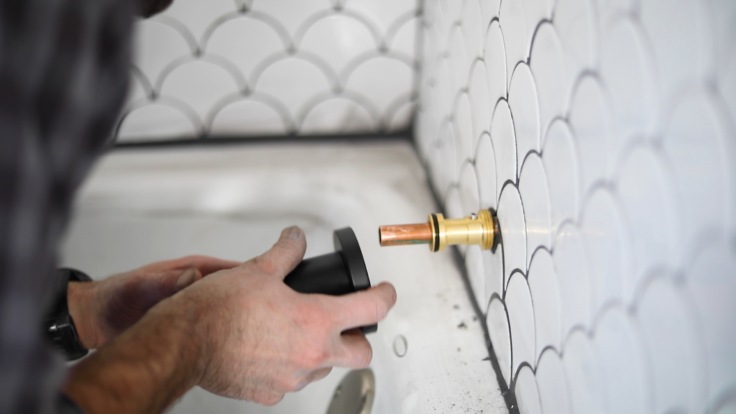
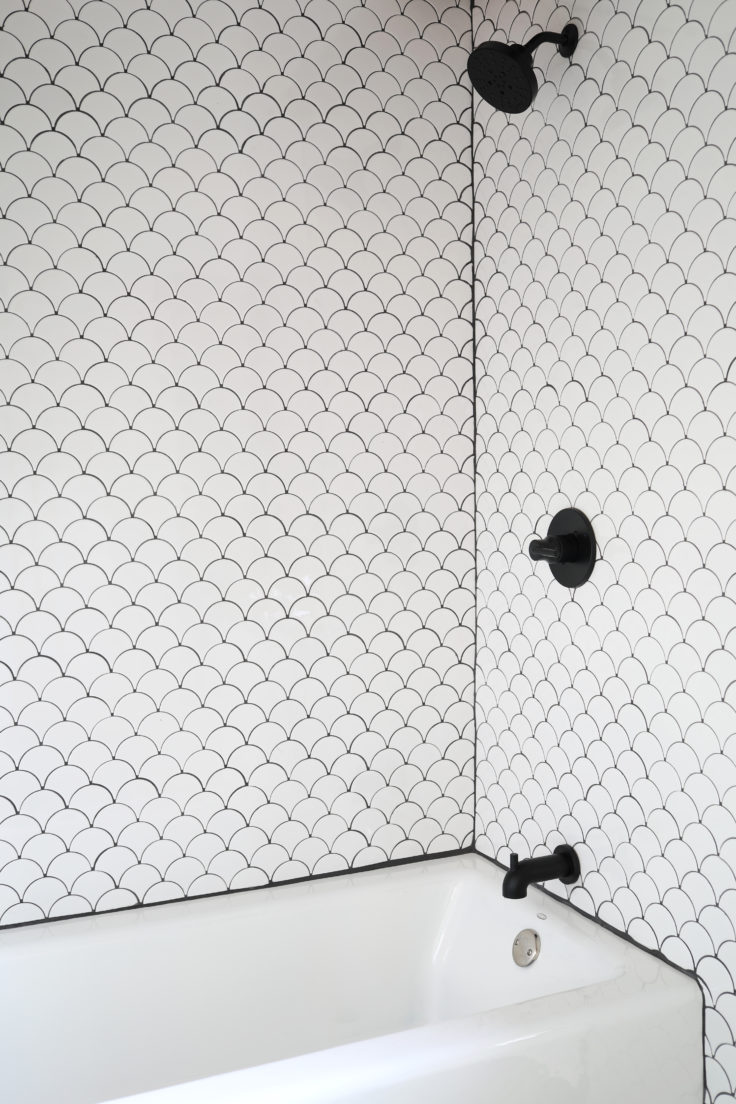
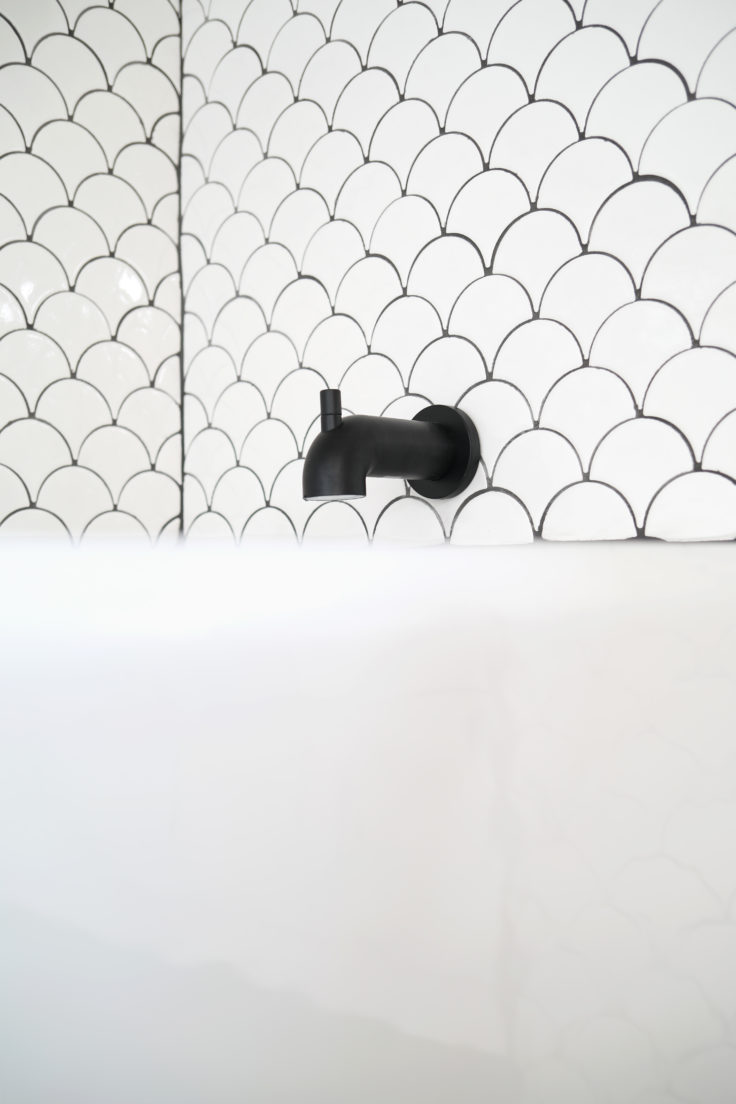
Now it's time to put the finishing touches on. We went with the Delta Trinsic set and it went in really simply. For the mixing vale you just remove the pressure testing cap, install the valve cartridge, cover, trim plate and then handle (check out the video for a quick time lapse!). For the shower head remove the rough-in pipe then add thread seal to the shower arm and screw into the treaded elbow in the wall. A couple wraps of plumbers tape and then turn on the shower head. For the tub filler just cut off the copper stub-out, de-burr, and slide the threaded keeper over the copper tubing. Seat the set screw and then turn the filler onto the keeper. Took us ~15minutes to get these in. We love the simple profile and the matte black finish that matches the rest of the fixtures in the house.


A tiled shower surround is one of those higher-effort/higher-return renovation projects. This one with Lowe's turned out wonderfully although in the past we've certainly learned some lessons the hard way. Check out this mishap on the shower floor at the Ravenna House! Oh the joys of DIY ;)
Any questions about this tile shower surround DIY, leave us a comment. Also, is there a DIY you'd like us to do? Let us know with a comment below.

Thanks to Lowe's for sponsoring this post!