
DIY Glider Chair (it's easy, I swear!)
THE FARMHOUSE
It's been awhile since we talked about the Farmhouse here on the blog, but we've made a few changes recently and I wanted to show you one of my favorites: a DIY glider chair for Daphne's nursery. Turns out a glider is a totally do-able DIY…actually it was down right easy. And today I’m going walk you through exactly how we created Daphne’s rocking, swiveling glider chair. Read on for this simple and inexpensive DIY…

Daphne’s bedroom // armchair, rug, curtains, all other sources here
Before I get to the DIY, let me explain why we decided to DIY this nursery staple.
Since about the time I found out I was pregnant with Daphne, I've been looking for the perfect glider or rocking chair. But I couldn't find one that I loved and was a reasonable price. In fact, the one I was eyeing at Restoration Hardware was $2,000 and I just couldn’t justify it. I was lamenting this fact to a friend when she suggested, "why not DIY one"? She pointed me in the direction of glider bases and got my brain turning.

These bases are technically designed as replacements for existing gliding chairs, but they work perfectly for a new DIY glider too. I picked out this slipcovered armchair at IKEA, which just so happens to have have a striking resemblance to the $2,000 glider I was eyeing at Restoration Hardware. Next, I ordered the base and then on a Saturday morning, with Daphne napping in the other room, Garrett and I put this glider together in less than an hour. Better yet, the grand total for this DIY rang in at a fraction of the Restoration Hardware glider. I am thrilled with the end product!
Psst: looking for more details on Daphne’s room? Check out these posts…
Now for the main event. A DIY tutorial on how to make your own glider chair…

DIY Glider
Time: 1 hour
Level: Easy
Format: blog post
Materials
Armchair - I chose a slipcovered armchair because babies are messy, but a chair with a skirt would work too. Just make sure you select a chair with a hidden bottom so you can't see the glider base when finished. budget tip: look in the "as-is" section for a chair without legs (since you’ll be removing them anyway)
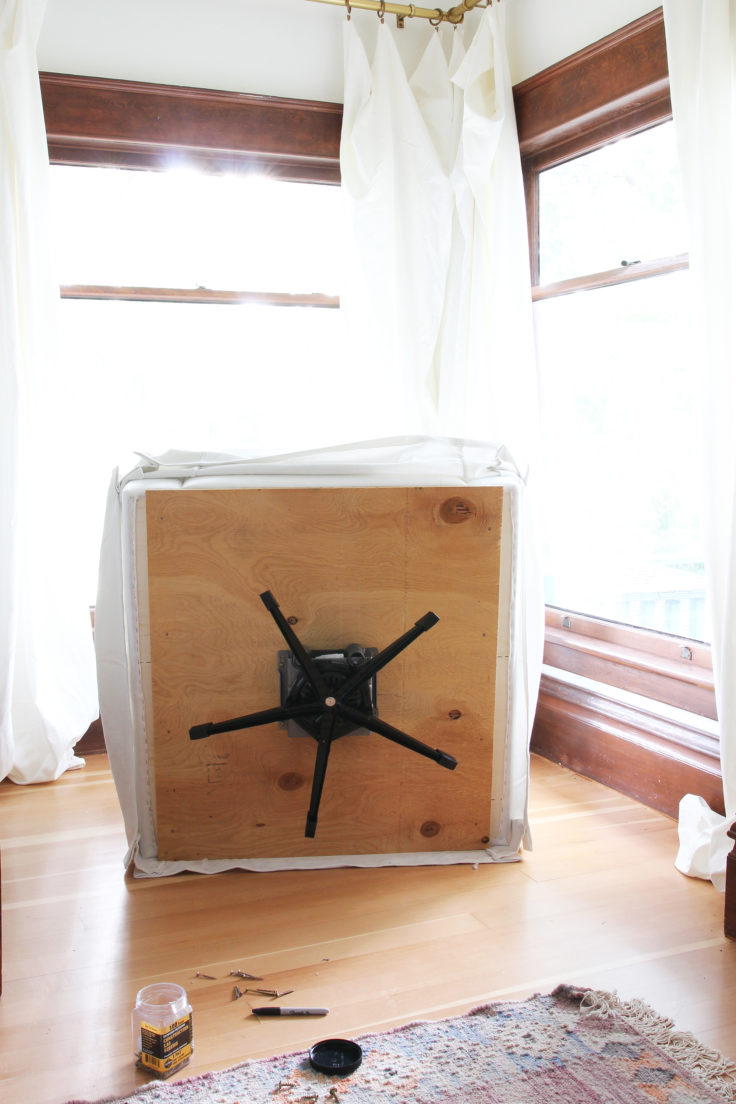
Base (we selected the adjustable swivel rocker, item #3540)
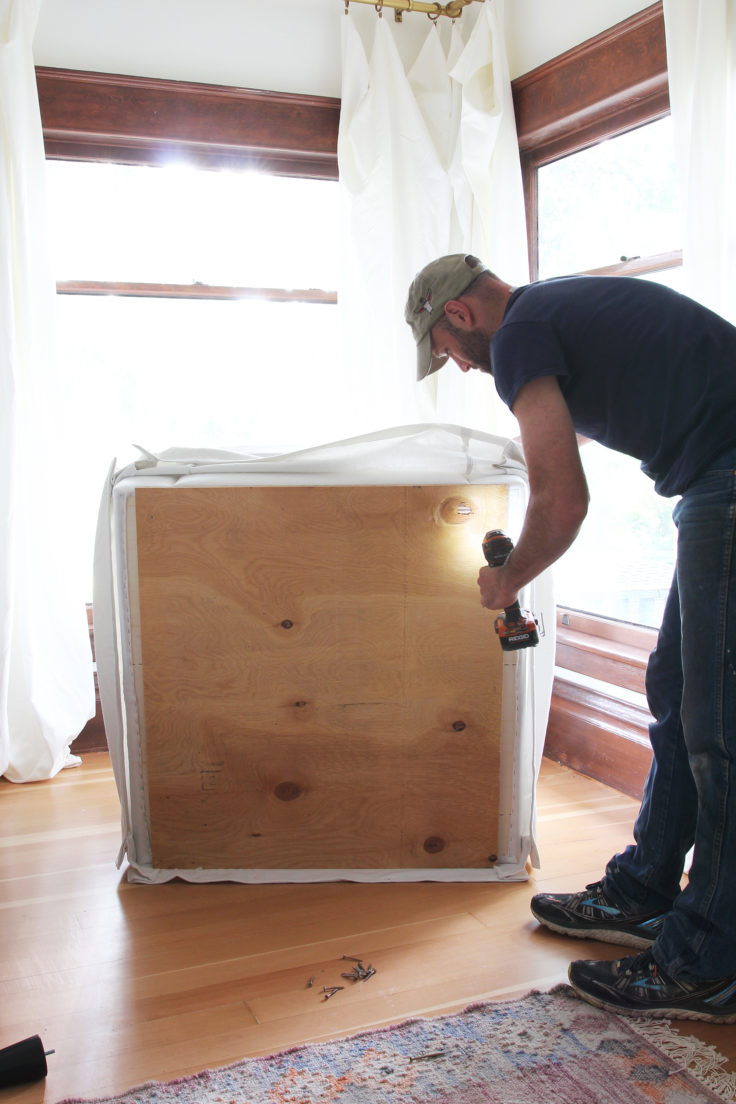
3/4" plywood, cut to dimension of the bottom of your chair (for the Farlov, we cut ours at 32" x 36")
1 3/4" screws to attach plywood to chair (we used about 10)
1" screws to attach base to plywood (we used 4 screws, but depending on the base you pick, you may need more)
Tools
Cordless drill
Measuring taple
pencil
Step 1 // prep chair
Take the legs off of your chair. If you’re assembling a new chair from IKEA, just don’t add the legs.
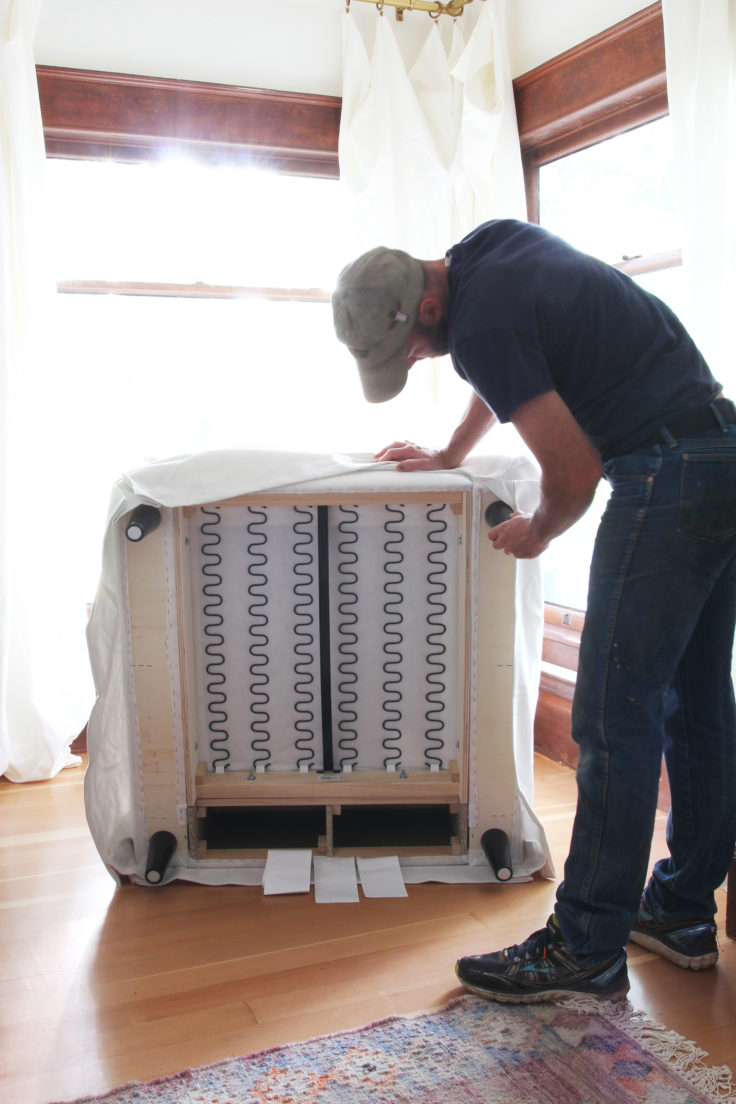
Step 2 // make a base
Attach plywood to the bottom of your chair using 1 3/4" screws (or longer). Make sure the screws go into the wood frame of the chair. We used about 10 screws.
Step 3 // attach glider base to plywood
Attach glider base to plywood using 1" screws. Positioning the base is the trickiest part of this whole DIY. We first attached the base to the center of the chair, but ended up moving it farther towards the back of the chair. You can move the base until you're happy with how the chair rocks.
And that's it! Pretty easy, right?! This DIY has definitely been done before, but I wanted to share it today in case you are looking for a nice glider without the crazy price tag. And speaking of the price tag, let’s break down what our glider cost.
What it cost
I also wanted to break down what this project cost…
$399 Glider
$59.80 Base
$0 Plywood and screws already on-hand
$458.80 total
Not bad for a glider these days. And of course, this number could decrease by finding a chair that’s missing legs from IKEA’s bargain section. Or find a vintage chair. This would be a really cool DIY with a vintage chair!

We’d love to hear if you try this DIY! Tag us on social media or leave a comment below.
*post updated 9/19/19