
Tacoma Converted Garage // DIY Built-In Hood Vent Tutorial

TACOMA CONVERTED GARAGE This post is sponsored by Lowe's.
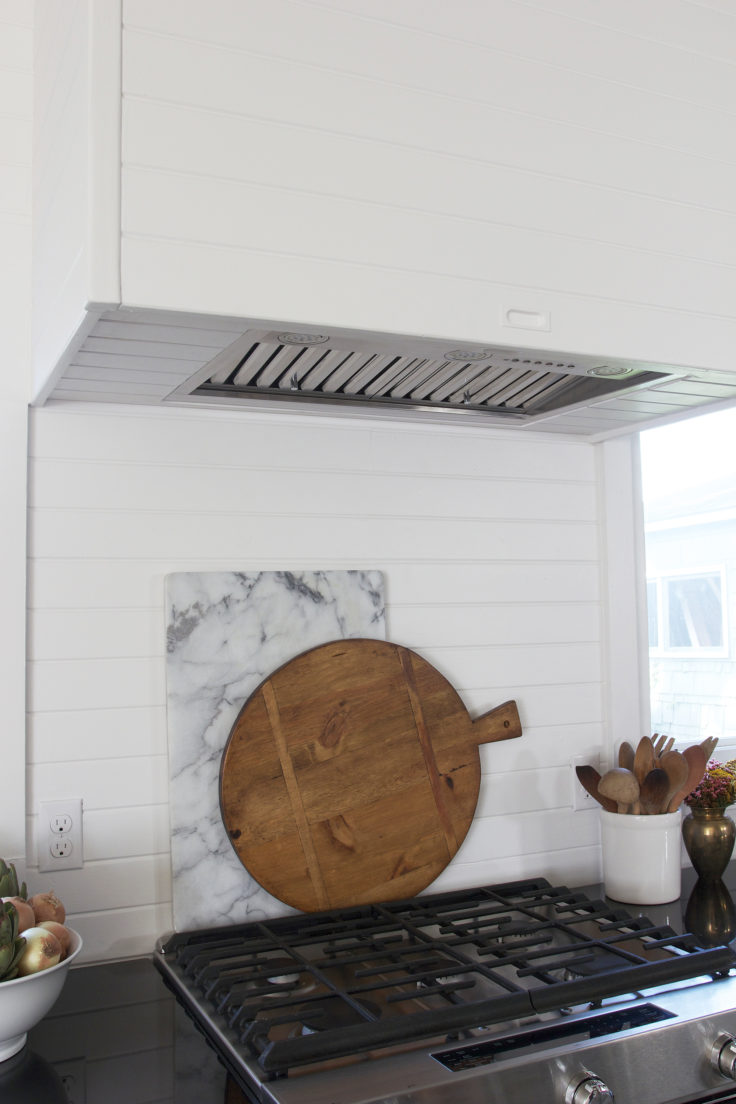
There are few things I love to see in a kitchen remodel more than a built-in hood vent. They're beautiful, simple, and lend a feeling of old-worldliness that I love. But best of all, they're easy to build. Even if you're a novice DIY-er, these custom hood vents are do-able and we're showing you how today. Read on for the Grit and Polish's guide to built-in hood vents.

It probably goes without saying that built-in hood vents have become a staple in our kitchen renovations. We've built two drywall hoods (here and here) and dreamt about a tile hood (#6daykitchenreno, anyone?), but we haven't created a paneled hood before. So when it came time to tackle the Tacoma Converted Garage, I tasked Garrett with creating a boxy, oversized hood vent, clad in salvaged tongue-and-grove (t&g) paneling. Boy did he deliver!


Built-in hood vents will naturally vary from project to project, so think of this tutorial as a roadmap. Our steps will guide you through your own project, but the dimensions, placement, and cladding material of your kitchen will determine your destination.
If you do use this tutorial, we'd love to hear about it! Tag us on Instagram or leave a comment below. pssst: check out the video version of this DIY tutorial below.
DIY BUILT-IN HOOD VENT TUTORIAL
Materials
GE Ducted Undercabinet Range Hood Insert
Cladding, we used salvaged tongue-and-grove but drywall and barn wood are common
Construction screws, we used type-17 point
Construction adhesive, *optional
Ducting, we used a 90-deg elbow, short section, and vent cap in 8" diameter
Tools
Porter-Cable Cordless Finish nailer
Irwin Clamps *optional but helpful
Dewalt Reciprocating Saw *optional, necessary only if your exterior wall requires a new hole
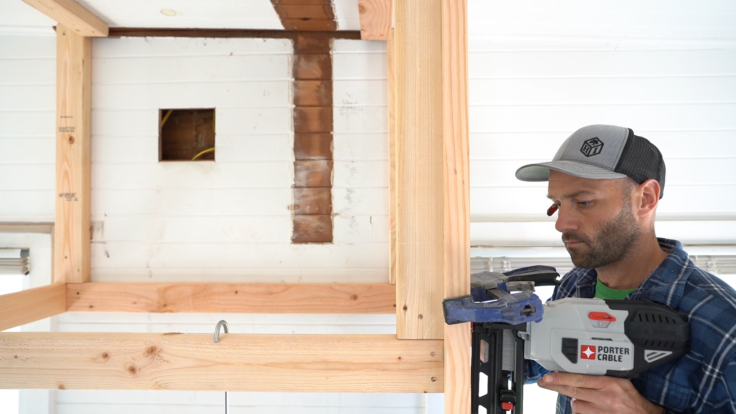
Step 1 // Build a 2X4 Frame
Building a frame is fairly simple once you decide on your design. We opted for an oversized hood that stretches 42" between the windows, but most people pick a dimensions closer to the width of their range and vent insert (usually ~30"). Once you know your overall dimensions, begin by building a frame out of 2x4s. Start with a box at the bottom of the hood vent, making sure your dimensions account for your cladding material thickness.
One note on dimensions: our vent sits at 36" above the stove top, which was our manufacturer's max recommended distance. Make sure you check local code and your manufacturer's recommendations when deciding where to place the hood. Pro tip: placing your hood on an exterior wall makes venting easier.
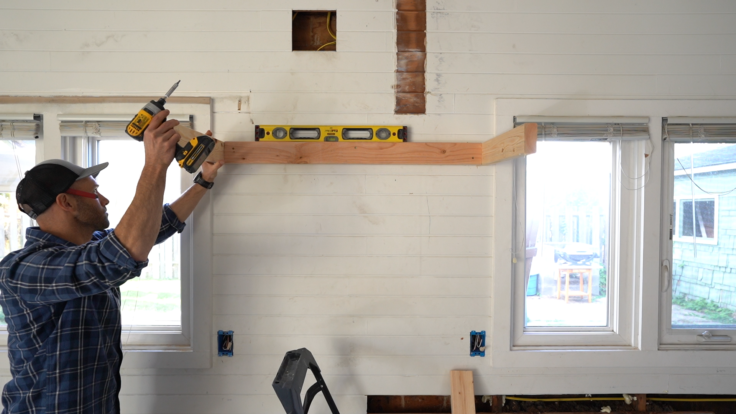
We were lucky that our walls and ceiling are covered in thick fir boards because we could attach our frame directly to that with screws. But absent thick wood on your walls, you'll want to find studs to attach your 2x4s at the walls and ceiling. The hood vent will be heavy when complete and requires a strong attachment.
Keep building your frame to the ceiling using 2x4s and make plenty of attachments with screws.
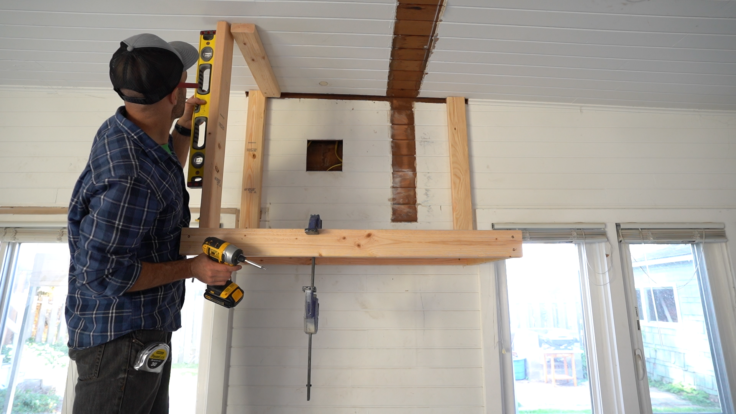

Before you can move on to the next step, all of the outside edges of your frame need to be on the same plane in order to attach cladding. See how our vertical members were sitting inside of the 2x4s at the bottom of our frame in the photo above? That won't work. S we added additional 2x4s to fur them out.
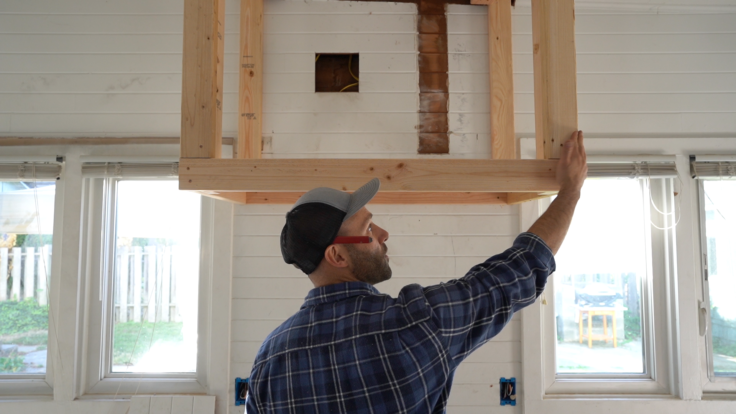
Before moving on to the next step, verify that your frame is secure by pulling on (or hanging from) the frame.
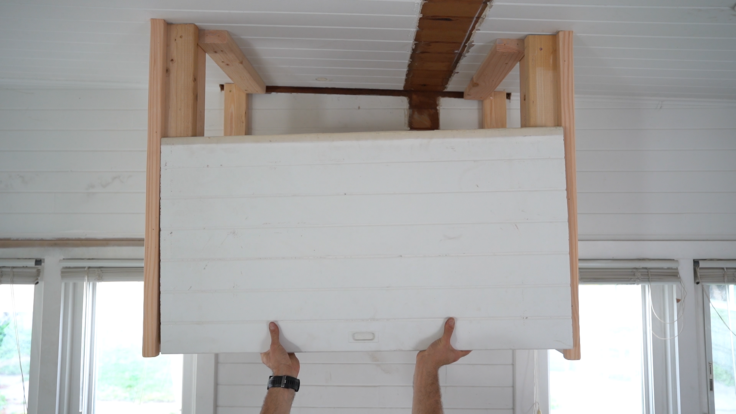
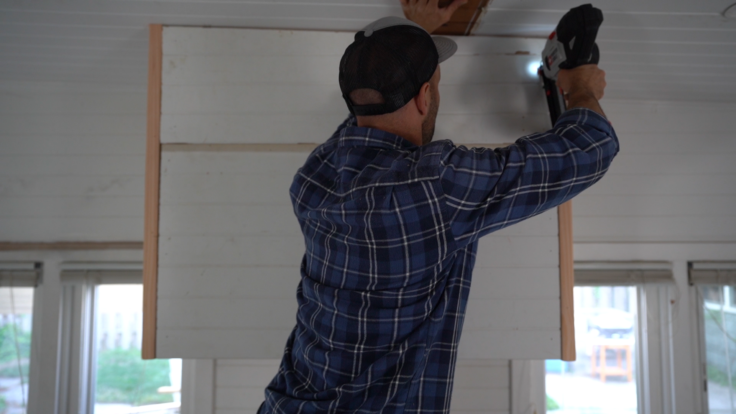
Step 2 // Add Cladding
Once the framing is in place, you can clad the exterior. We started this process at the corners. Since we used tongue-and-grove and not drywall, we opted to install a corner piece of trim so we could butt the t&g edge up to it. This would not be necessary if using drywall. After the corner members are secured, attach your cladding using brad nails and construction glue (or drywall screws if you're using drywall or tile backer).
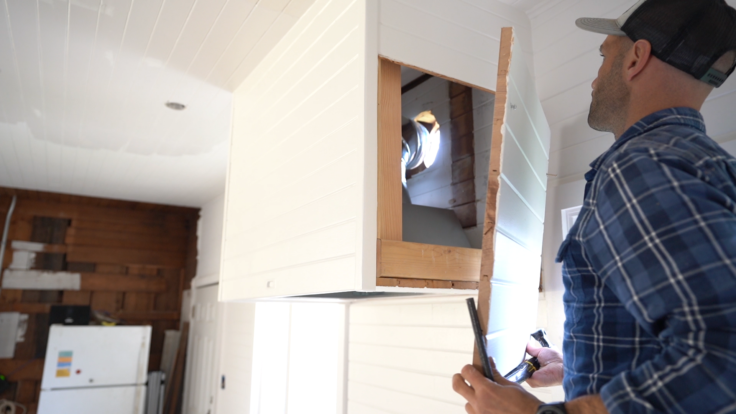
It's good to keep the final vent insert installation in mind before completing your cladding. Garrett opted to create an access panel on one side of our hood in order to connect ducting and electrical later on. He created the access panel by securing a small section of t&g with screws rather than nails. This way we can remove the small panel with a screwdriver to access the vent and then screw it back into place afterwards. If an access panel doesn't work with your design, make sure to install the vent insert (and make electrical and ducting connections) prior to finishing the cladding.
Cladding the bottom of the hood is best done with your insert on hand. Cut a rectangle from a piece of your cladding the size of the insert and then attach it to the underside of the framing. pssst: Since our hood was significantly larger than our vent insert, Garrett added two 2x4 supports across the bottom of the frame to attach the vent insert and cladding to.

Step 3 // Caulk, Prime and Paint
This step is pretty self explanatory. Put the finishing touches on your hood with whatever finish you have dreamed up. For us, that meant caulk and then primer and paint, but it could also involve drywall mud, plaster, tile, or polyurethane.

Step 4 // Install Insert and Hook up Electrical and Ducting
Now that the hood is built, it's time to install your vent insert and hook it up. Start by addressing the venting. All the seams in the ducting need to be sealed with aluminum tape. Since we're working on an exterior wall, we cut an 8" hole through the wall behind the hood in preparation for venting.

Next install the vent insert by holding the insert in place and screwing it to your 2x4 frame. This is a job best done with 2 people. Make sure the vent insert is securely attached to the frame of your hood before removing your hands.

Now you're ready to hook up the power and ducting to the unit (this is where the access panel comes in handy!). Make sure to consult your insert's manufacturer instructions before hooking up your unit. To power our GE unit, we brought a dedicated circuit from the panel using 12-2 wire. Make sure the breaker is turned off when you make the electrical connection to the unit. Next we ducted the insert through the hole in the back wall using (1) 90-degree elbow, a short transition piece, and a vent cap.
Pro Tip: the larger your ducting and the shorter the run, the quieter your fan will be.

Turn your breaker back on and confirm the insert works. Once it's booted up, you can place your access panel back on. You're done! I hope you love your new vent hood as much as I love this one! Thanks Garrett :)

*This post is sponsored by Lowe's. All content, ideas, and words are our own. Thank you for supporting the brands that support the Grit and Polish!