How we Customized Basic Stock Cabinets for the Poplar Cottage Kitchen
THE POPLAR COTTAGE
*this post is sponsored by Handy Products (makers of the red pails we all know and love!)
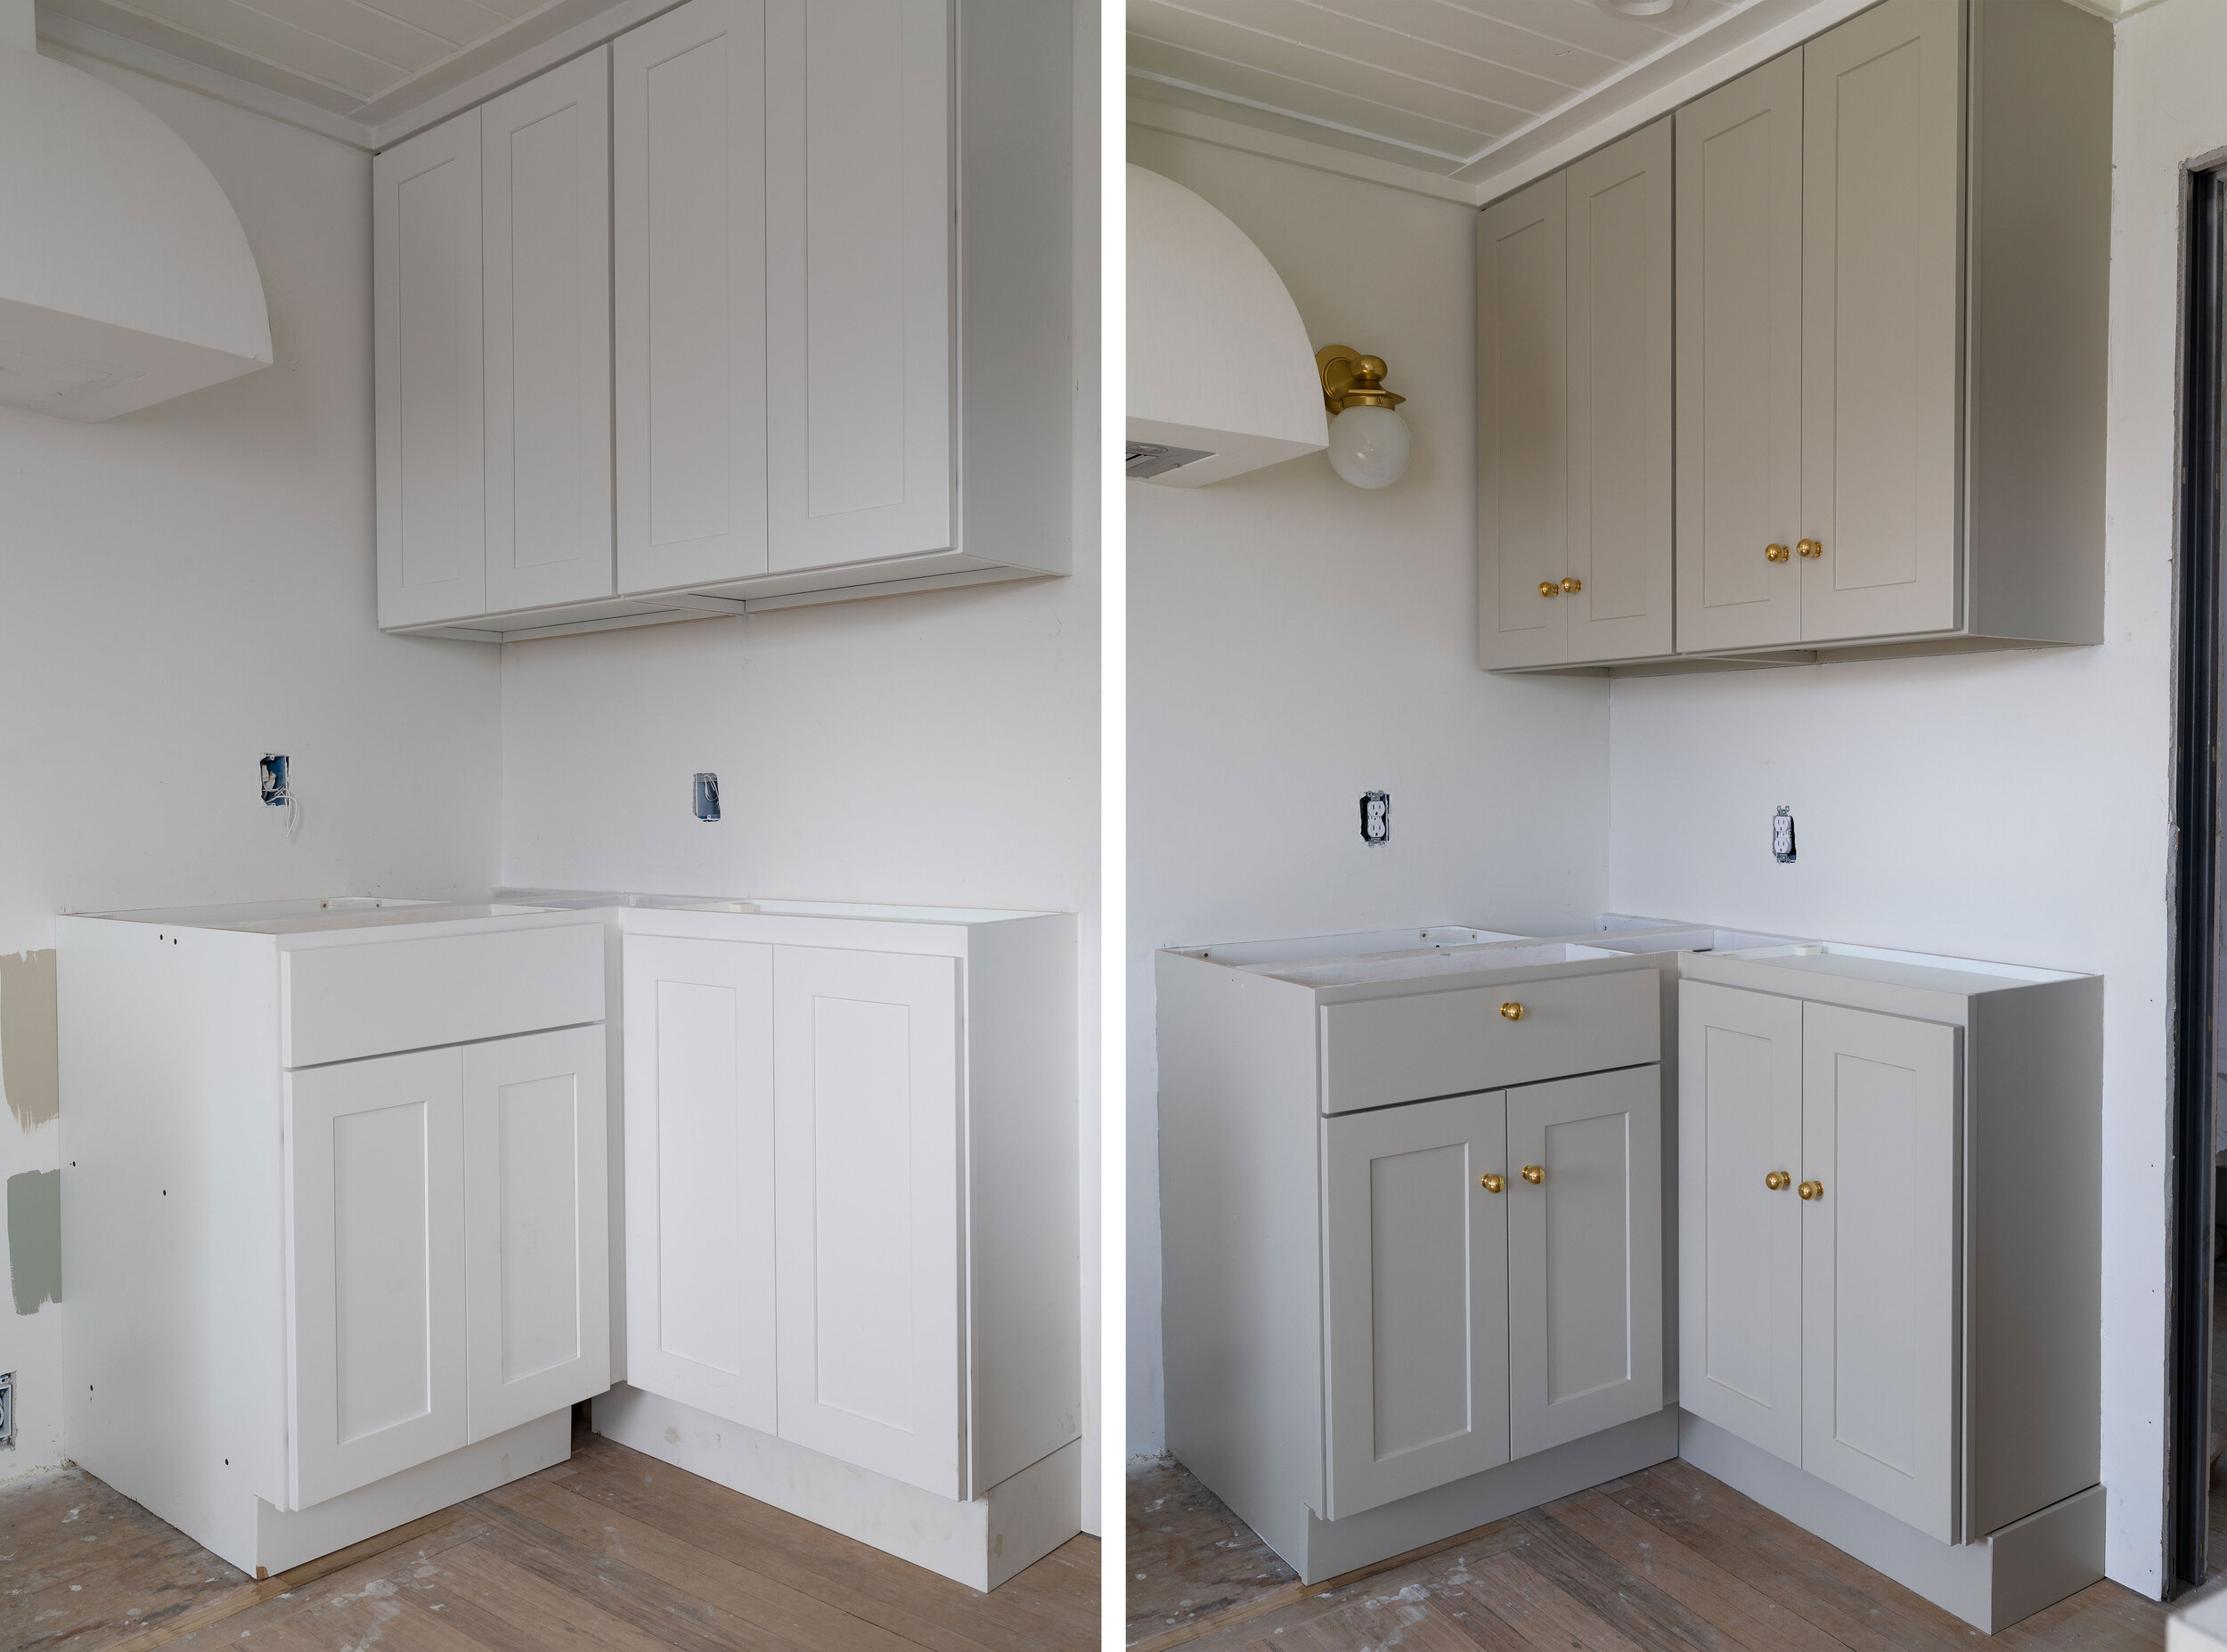
Custom cabinets weren’t in the cards for our Poplar Cottage kitchen remodel, but over the years we’ve learned a few tricks for turning basic stock cabinets into something a little more crafted. And today we wanted to share our process and show you how the Poplar Cottage cabinets turned out. For those of you who weighed in on the cabinet color last week, you might be surprised by what we picked. Let’s get into it…

We love how the cabinets turned out at Poplar, but full disclosure, we painted these cabinets 4 times before getting it right (you can see all of our Handy Paint Pail liners below to prove it 😂). And I’m so glad we persisted because it finally feels right. But before we talk paint, let’s start with the other steps we took to give these stock cabinets a more custom look.

psst: all sources are at the bottom of this post
Layout
Our cabinets came from GS Building Supply in Seattle. We’ve used their all-wood-and-plywood cabinets four times before and have always been impressed with their quality and price. But of course, stock cabinets mean you don’t get a lot of options on sizing, color, and design. And in a small space like the Poplar Cottage, you really want to maximize storage and get exactly the right size. So we did some small modifications to the cabinets to maximize storage. Let me show you how…
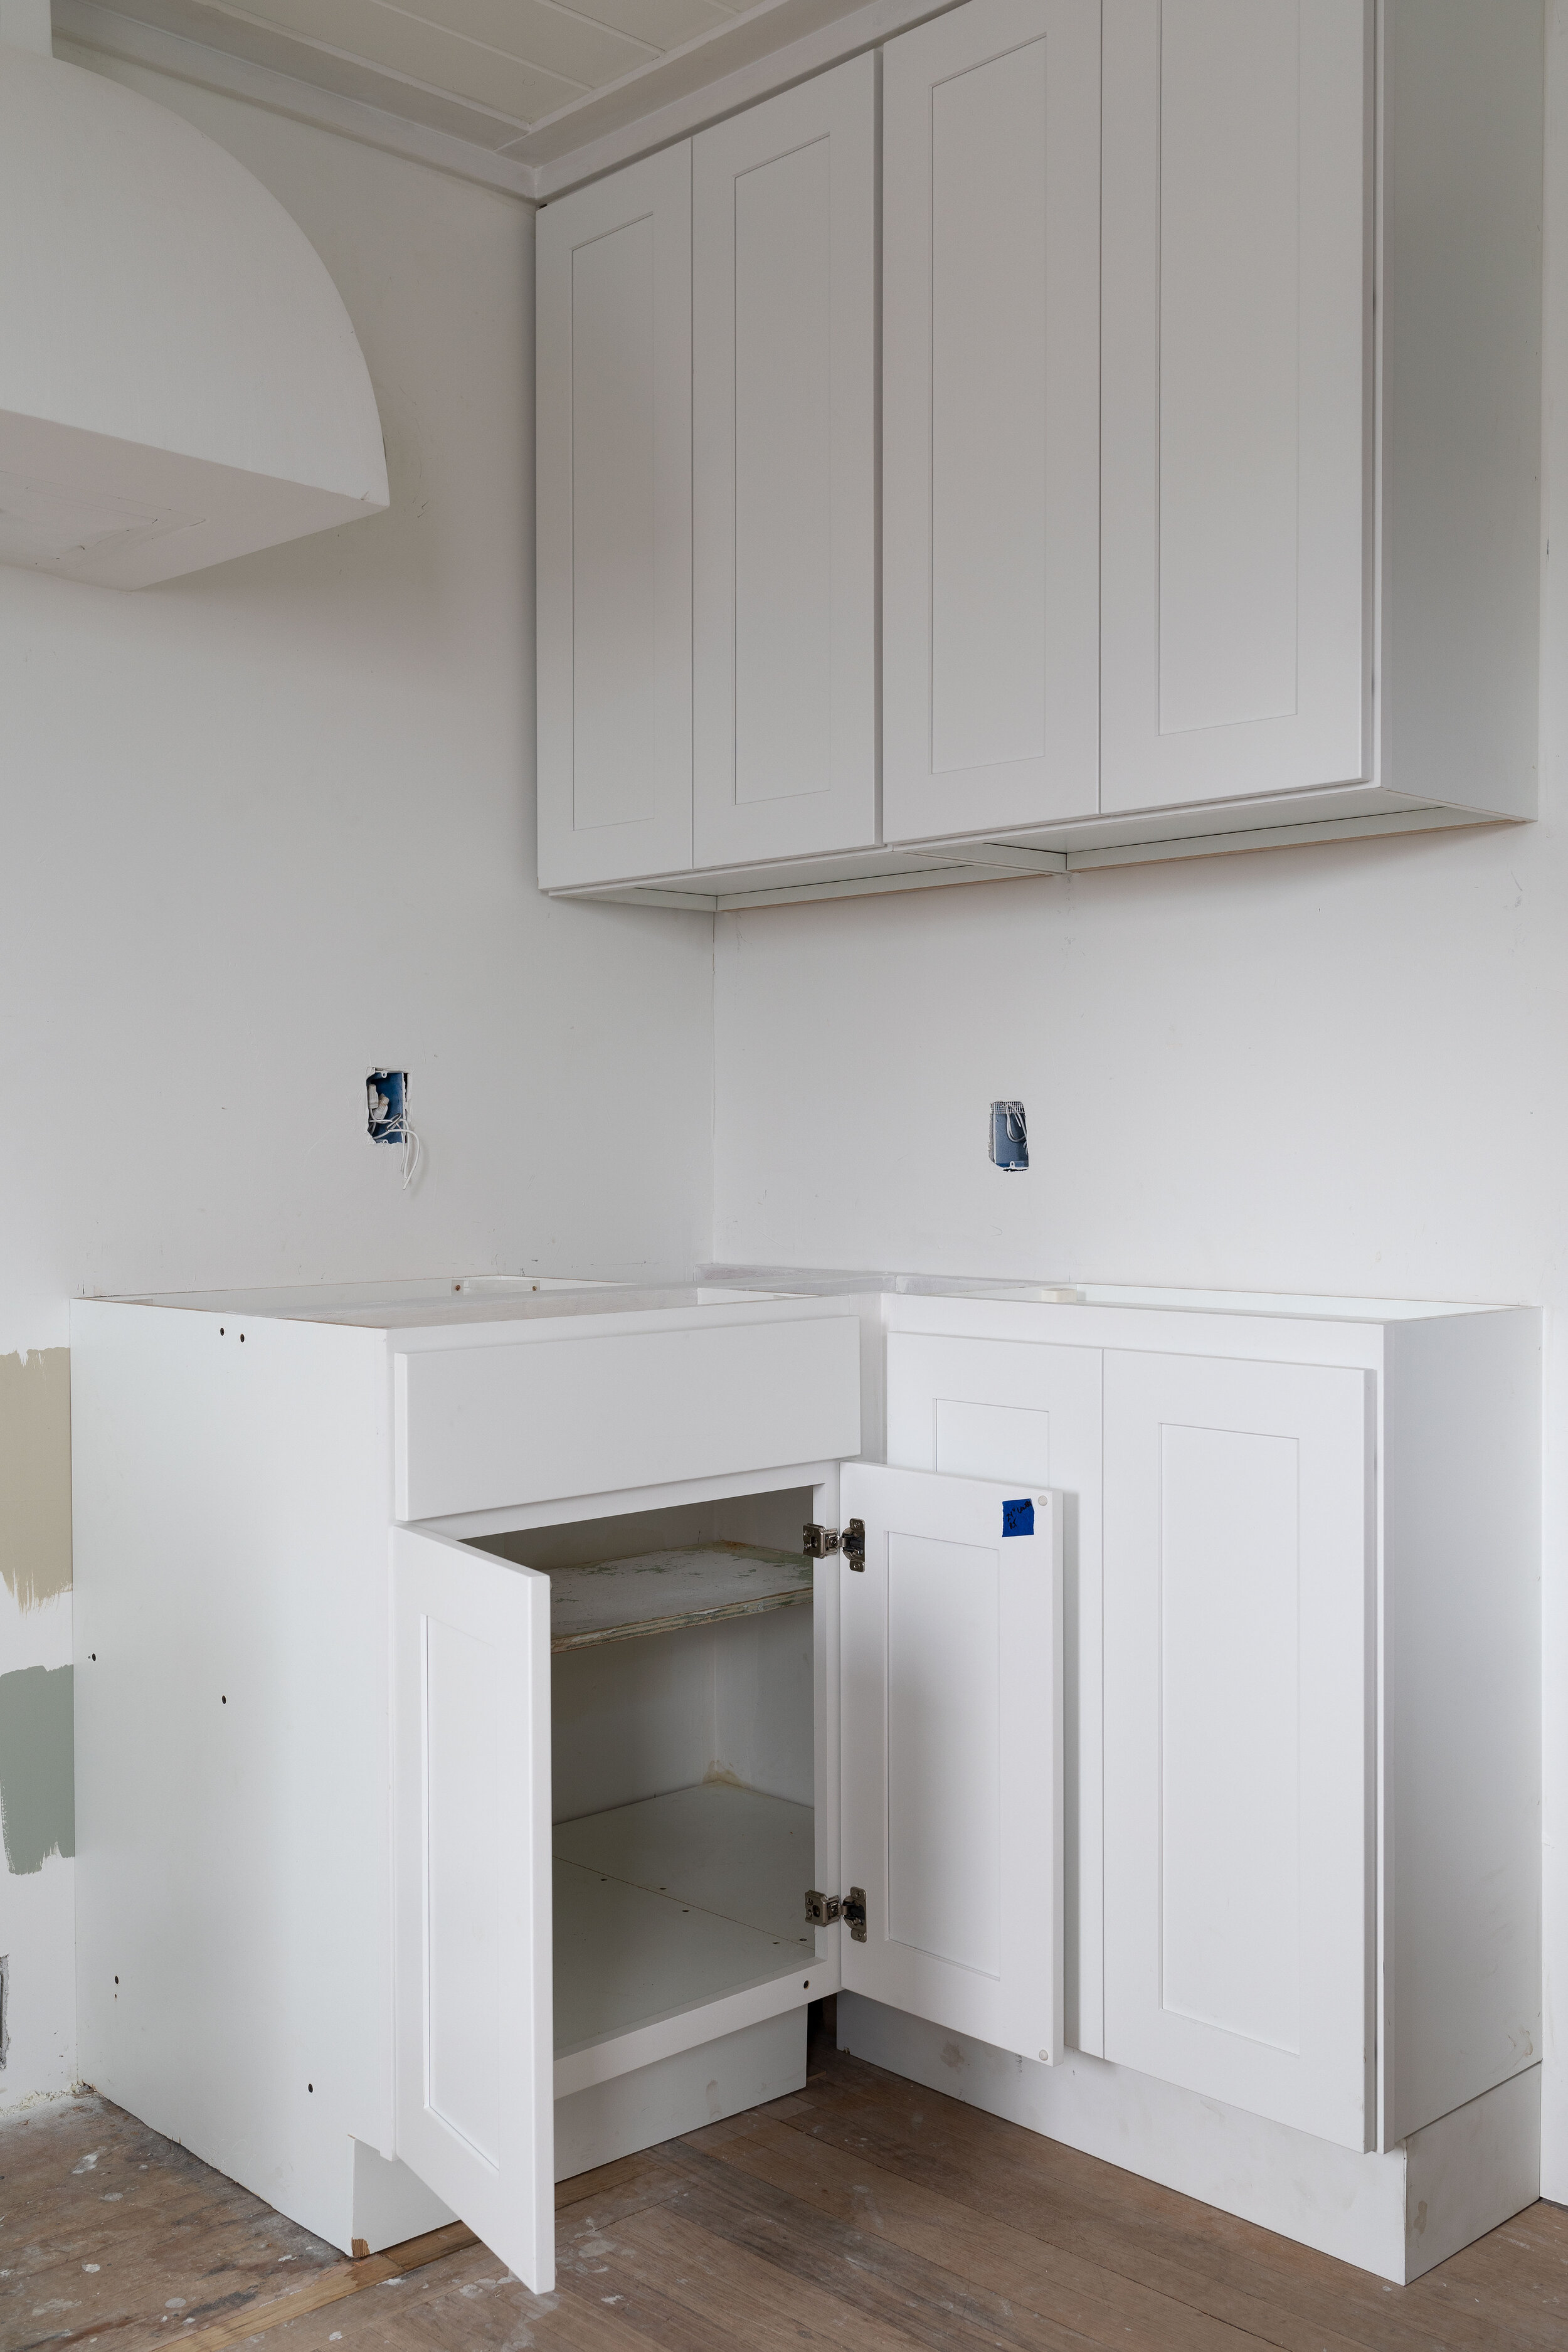
‘Hutch’ base cabinet
We only had room for a 12”-deep base cabinet on the far wall so we turned a 12”-deep upper into a base by raising it up and adding a toe kick. The stock 12” x 30” upper cabinet matched the height of the adjacent base cabinet almost exactly (minus the toe kick) so that was an easy retrofit. My goal for this this shallow base cabinet is that it feels reminiscent of an old hutch base when it’s all said and done.


Corner cabinet
The ‘hutch’ upper cabinet made for an awkward corner so rather than just close up a 12”x24” space in the corner, we retrofitted the adjacent cabinet by blowing out the side and adding shelves all the way to the corner. Every square foot of storage is valuable in a small kitchen! We also added a couple filler pieces in the corner to space the adjacent doors and drawers apart so they could freely open when the hardware was installed.

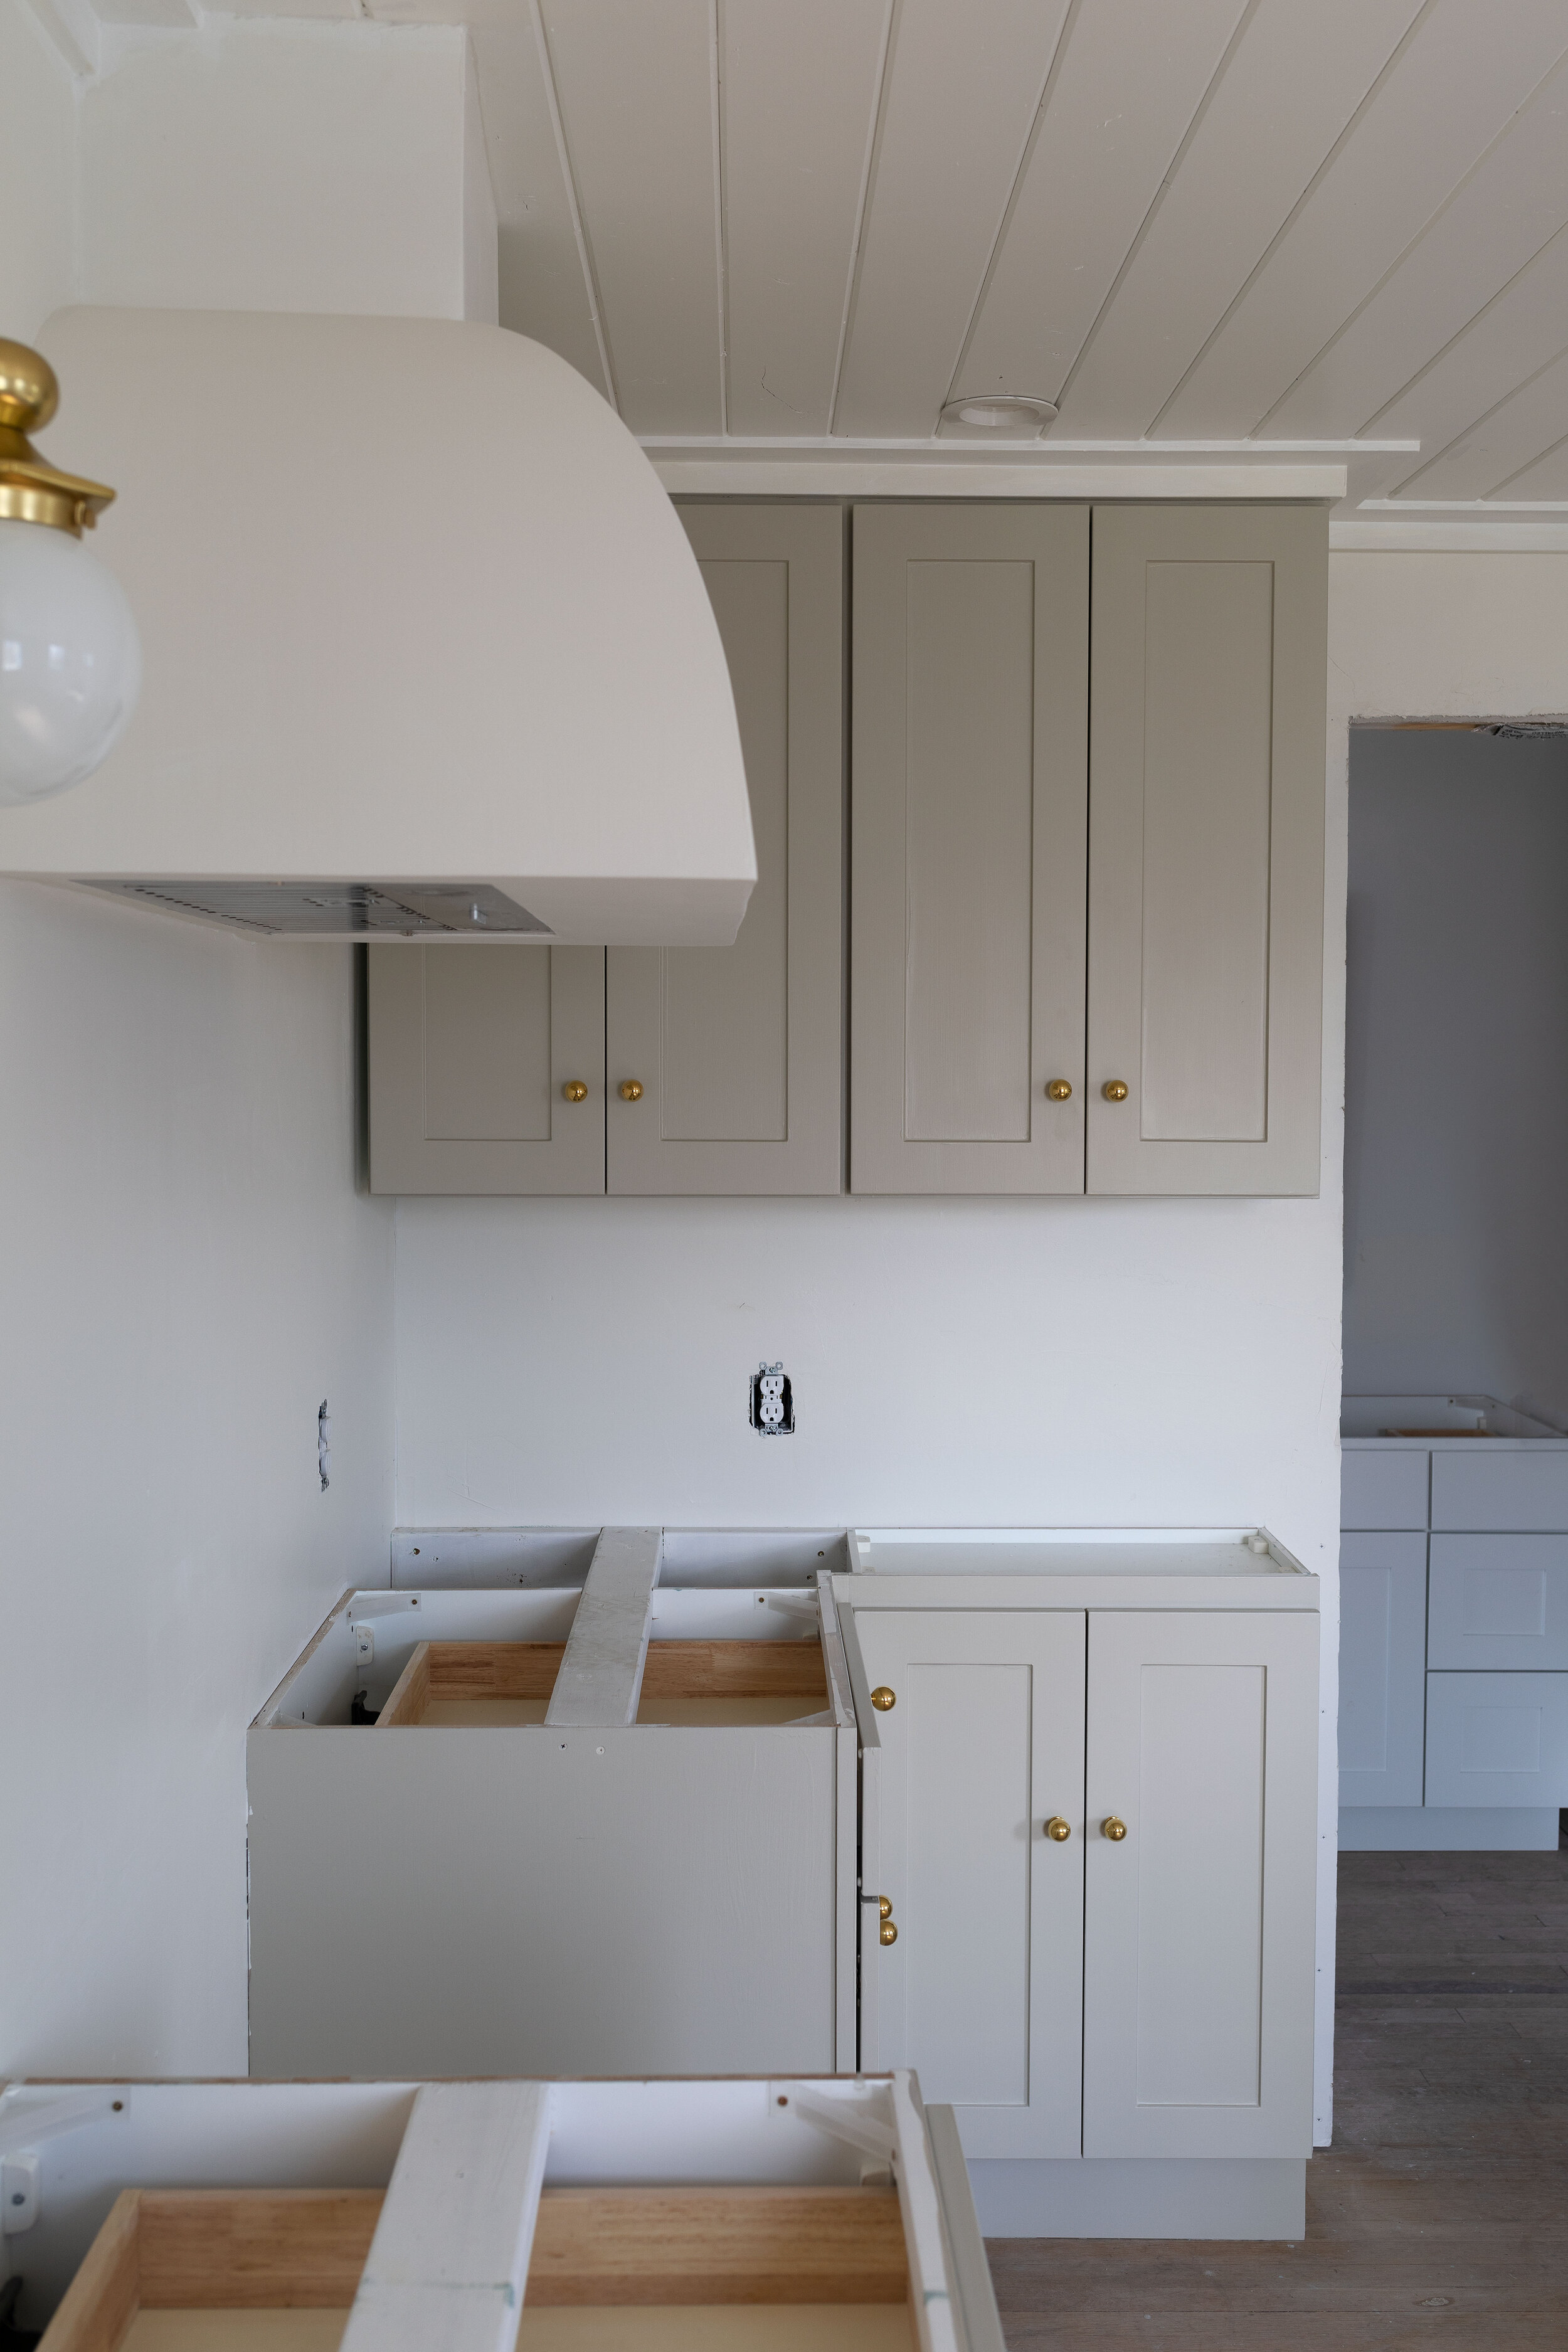
Fridge Cabinet
We also turned a basic over-the-fridge cabinet into a custom one by adding a plywood panel on the side. I’m a big fan of these full-height fridge cabinets - they always make a kitchen feel more crafted and higher-end. Unfortunately the stock cabinet was only 12” deep, which left a gap of 30”x18” of empty space behind it. So we knocked out the back of the stock cabinet and extended the bottom all the way to the back wall. Quite a bit of extra storage for this small kitchen!


Molding
Crown is a finishing touch that leads the cabinets a built-in look and we continued our flat-stock ceiling detail around the uppers and also around the fridge nook. We’re big fans of easy-to-install flat crown molding and have a post on that from our Farmhouse kitchen available here.

Paint!
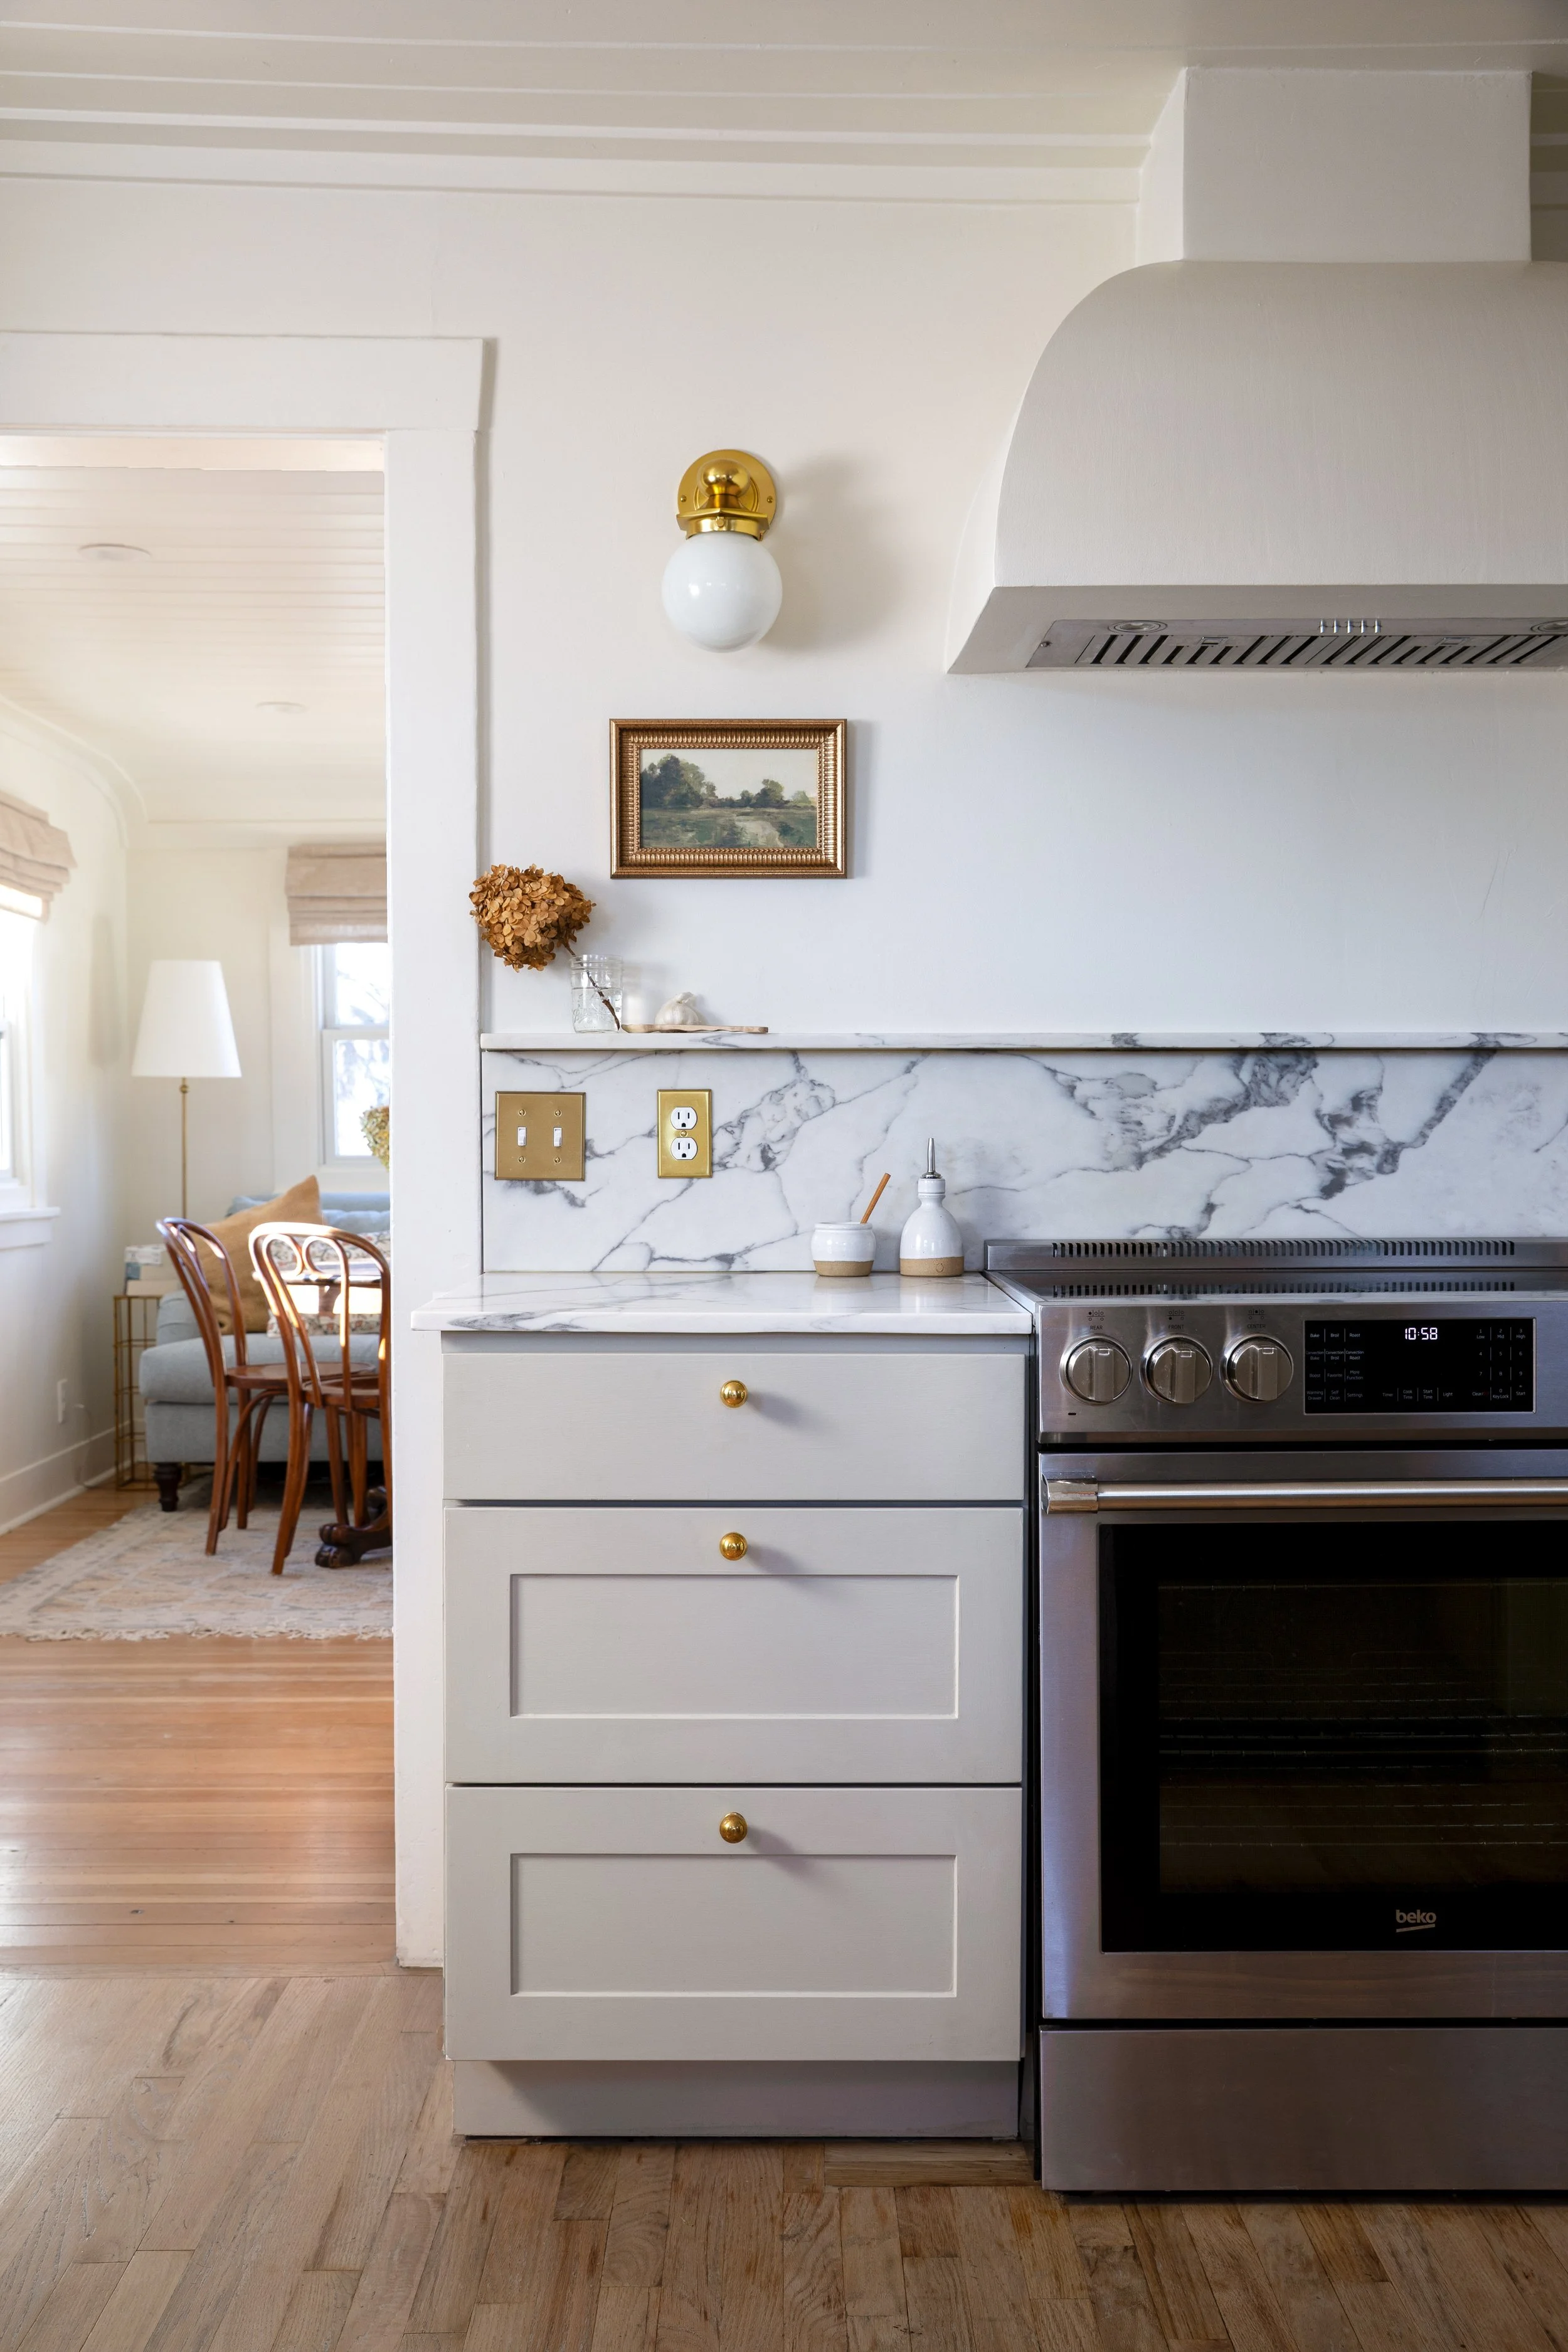
Paint really is a miracle and can take cabinets from basic to a whole-lot-better in a day. I won’t go too far into the process of painting cabinets (we shared a DIY last year here). But I will say that painting the cabinets was the easiest step…but also the hardest, because picking a color is hard. In the end, we used Farrow and Ball’s Old White (matched by Sherwin Williams) in a Satin finish and hand painted the cabinets with a foam brush and 6”-roller to give them a vintage texture. There’s something about hand painted cabinets that feels older more crafted, and truer to the period of the home.
Having the right tools makes any project go smoother and this holds true for painting. We used the heck out of our Handy Paint Pails, liners, and covers during this project. The Handy Liners made switching colors super easy (more about this below!) and we just put the Handy Covers over our pails at the end of the day so we could quickly pick up where we left off the next morning. The covers are a must-have for those of us who don’t love paint clean up! The pails are really thoughtfully designed with a magnetic brush holder on the side, so you don’t have to worry about losing your brush in paint. Garrett preferred the larger Handy Pro Pail that accommodates a 6” roller and a brush and I liked the classic Handy Paint Pail for my foam brush.
For those of you interested in my slightly-embarrassing, but real-life paint color fiasco, here’s the story… After asking everyone’s input on my two favorite paint color samples last week and stewing over the decision 24/7, I opted to go with Farrow and Ball’s bone. It’s a neutral that has a slight green feel to it and it felt like the right choice. But mid-way through me painting the frames Garrett walked in and said, “I think we should take a moment and reassess the color.” Eek! I stepped back and realized he was 100% right. The color felt too dark and muddy and it just wasn’t right for the space.

So we went with plan B which was actually my favorite color sample we had on the wall…green blue. I love, love, love the color but it turned out a little too beachy for this cottage, plus the bright and bold color really shrunk the kitchen.


So I headed back to the paint store again for a gallon of elephant’s breath, a really pretty neutral/gray with a purple tint. It was another one of the samples I had tried on our wall and one I really loved. But by the time the first coat had dried on the cabinets, I was nervous. It looked SO purple in our space. It felt just a little too pretty. After sleeping on it I knew it just wasn’t right.


So back to the paint store again (yes, the employees knew me by name by now 😉). I bought a sample of Farrow and Ball’s old white, which is similar to the off white sample I had on our wall, but a touch darker and more grounded with a hint of green – exactly what I had been after when I started. I felt like this was THE COLOR, so I went back for a gallon. After we got the first coat on I knew we finally finally had it right! Old white was just the color the space needed.
Moral of the story, color is hard, but keep trying samples until you get it right! Also, Garrett deserves some kind of husband of the year award, because he painted these cabinets with me 4 times without a single gripe!

Here’s how the cabinets turned out with the customization, fresh paint, and my favorite unlacquered brass hardware.


BTW we have Benjamin Moore’s Swiss Coffee on the walls and Simply White on the ceilings. We’re still deciding if the Swiss Coffee looks good or too yellow in here. It definitely changes hues a bit with the light, just like the cabinet paint does.
Here are two side-by-sides of the cabinet paint makeover just for fun.

And as promised, below are the Handy Paint Pail Liners of all 4 colors we tried: bone, green blue, elephant’s breath, and old white (all Farrow and Ball). Goodness, I hope we never repaint these cabinets ever, ever again!

Special thanks to Handy Products for sponsoring this kitchen paint project! Our cabinets feel anything but basic now.
Sources
Color: Farrow and Ball Old White (color matched by Sherwin Williams)